If your manufactured home turns into a sauna every July and a meat locker every January, you’re dealing with a structural problem, not a thermostat problem. Manufactured homes lose and gain heat far faster than traditional site-built houses because of how they’re framed, skirted, and underpinned. The culprit is something contractors call the “thermal envelope” — the continuous barrier of insulation and air-sealing that’s supposed to wrap your entire home, from the roof cavity down through the walls to the belly pan underneath the floor. When that envelope has gaps, your HVAC system works overtime, and your utility bill shows it.
The good news: this is fixable, and most of the fixes pay for themselves. Upgrading the insulation in a mobile home can reduce monthly utility bills by 20% to 30%, according to data from the U.S. Department of Energy. This guide walks through exactly where manufactured homes leak energy, which materials actually work in tight mobile home cavities, a full walkthrough for insulating the underbelly, and how to decide whether this is a weekend DIY project or a job for a licensed contractor.
Why Mobile Home Insulation Is Different (and Crucial)
Manufactured homes aren’t just smaller versions of site-built houses — they’re built to an entirely different rulebook. Wall cavities run 2×3 or 2×4 instead of the 2×6 framing common in modern stick-built construction, leaving less physical space for insulation. Roof cavities are often shallow “bowstring” trusses that taper to almost nothing at the edges. And the underside of the home — the belly — is wrapped in a thin board or fabric membrane that’s exposed to weather, pests, and physical damage in a way no site-built floor ever is.
If your home was manufactured before June 1976, it predates the HUD Code entirely and likely has minimal to no insulation by today’s standards. Even homes built after that date were constructed to meet HUD’s regional thermal zones (Zone I, II, and III), which set minimum R-value requirements based on climate — but those minimums were calibrated decades ago and are noticeably lower than current residential energy codes in many states.
That gap matters financially. The U.S. Department of Energy has found manufactured homes consume meaningfully more energy per square foot for heating and cooling than comparable site-built homes. Most insulation retrofits — particularly underbelly and skirting upgrades — pay for themselves within two to five years through reduced utility costs, depending on local energy rates and the scope of the work.
The Three Critical Zones Where Your Home Is Losing Energy
Before buying a single roll of insulation, walk your home and mentally divide it into three zones. Each one fails differently, and each needs a different fix.
The Roof Cavity and Ceiling
Most manufactured home roofs use bowstring or shallow truss systems that leave only a few inches of depth at the center and almost none at the eaves. Original batt insulation in this space often sags, compresses, or was installed too thin to begin with. Because heat rises, an under-insulated roof cavity is usually the single biggest source of summer heat gain and winter heat loss.
The Exterior Walls
Mobile home walls are typically framed with 2×3 studs, sometimes 2×4, giving you a cavity of just 2 to 3.5 inches to work with. That’s not much room for insulation, and tearing out drywall to redo it from scratch is invasive and expensive. This is why “drill and fill” blown-in insulation has become the standard retrofit method for mobile home wall insulation — it doesn’t require removing interior finishes.
The Underbelly (Belly Pan / Crawlspace)
This is the most vulnerable zone in the entire structure. The belly wrap — a layer of fabric or board stapled to the bottom of the floor joists — is meant to hold insulation in place and block ground moisture and pests. When it tears, from age, animals, or storm damage, insulation sags, falls out, or gets soaked, leaving you with frozen pipes, drafty floors, and an open invitation for rodents.
Best Insulation Materials for Manufactured Homes
Not every insulation product designed for site-built homes works well in mobile home cavities. Here’s how the main options stack up.
Fiberglass Batts and Rolls
Fiberglass is the most budget-friendly option and the easiest to source at any hardware store. It works well in accessible, open wall cavities and underbellies where you can lay it in without compressing it. Its downside is that it loses much of its R-value if squeezed into a cavity that’s too narrow, so precise sizing matters.
Blown-In Cellulose or Fiberglass
For wall cavities you can’t open up, blown-in insulation is injected through small drilled holes — the “drill and fill” method — and conforms to every gap, wire, and pipe inside the cavity. It’s also the standard choice for topping off thin attic and roof cavity insulation without disturbing the trusses.
Spray Foam (Open-Cell vs. Closed-Cell)
Spray foam insulation for mobile homes delivers the highest R-value per inch of any product on this list, which matters enormously in a 2×3 or 2×4 wall. Closed-cell foam also acts as its own vapor barrier and adds rigidity to the structure, but it’s heavier — a real consideration on a mobile home roof, where excess weight can stress the trusses — and it requires professional equipment to install correctly.
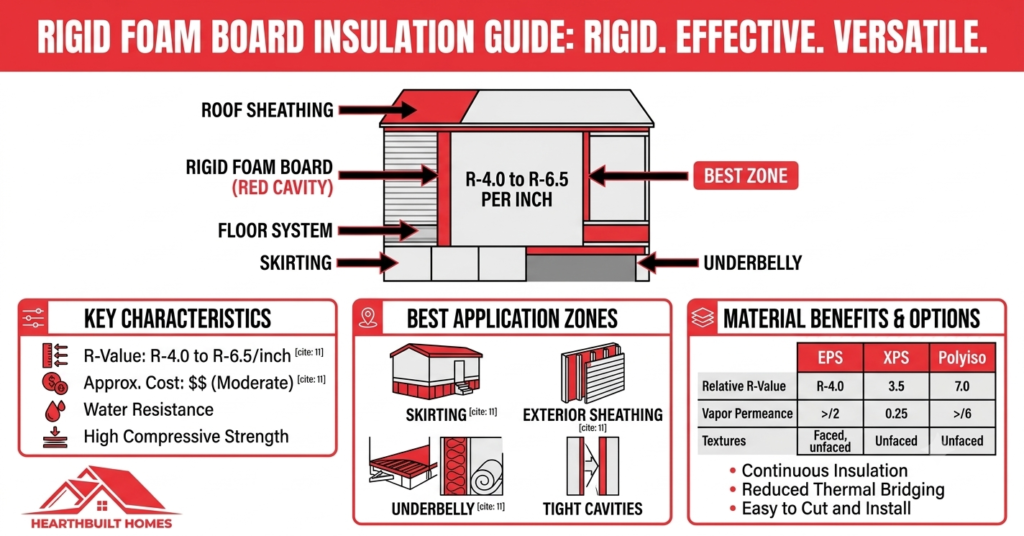
Rigid Foam Board
Rigid foam panels are most useful behind skirting and over exterior wall sheathing, where they add a continuous thermal break without taking up cavity space. They’re a strong complement to insulated mobile home skirting projects rather than a primary wall or underbelly solution.
Material | R-Value per Inch | Approx. Cost | Best Application Zone |
Fiberglass Batts/Rolls | R-3.1 to R-3.7 | $ (Low) | Accessible walls, underbelly |
Blown-In Cellulose/Fiberglass | R-3.2 to R-3.8 | $$ (Moderate) | Closed walls, roof cavity top-off |
Spray Foam (Open-Cell) | R-3.5 to R-3.8 | $$$ (High) | Walls, tight cavities |
Spray Foam (Closed-Cell) | R-6.0 to R-7.0 | $$$$ (Highest) | Underbelly, vapor-sensitive areas |
Rigid Foam Board | R-4.0 to R-6.5 | $$ (Moderate) | Skirting, exterior sheathing |
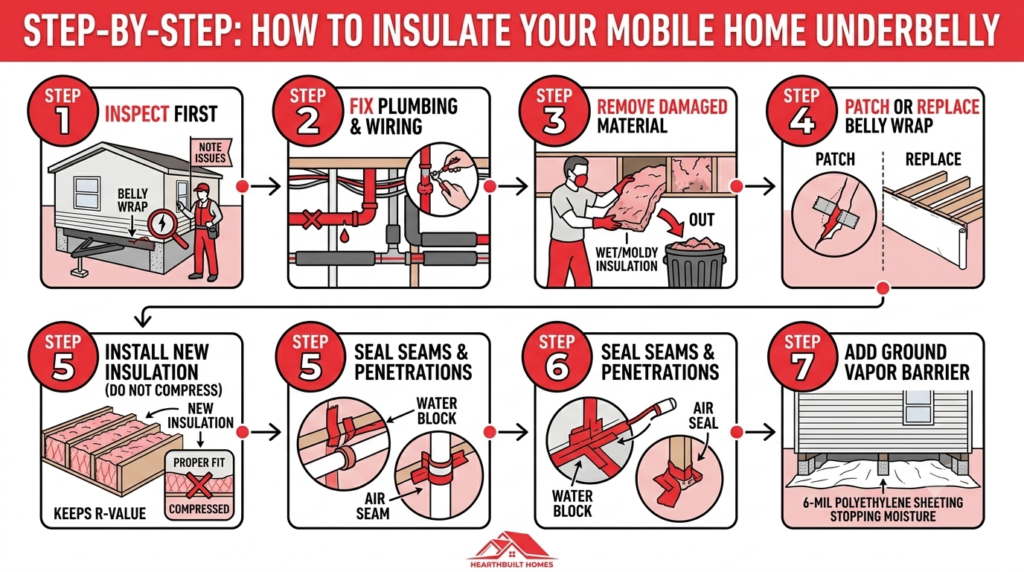
Step-by-Step: How to Insulate Your Mobile Home Underbelly
Insulating mobile home floor and underbelly is the single most impactful project most owners can undertake, and it follows a logical sequence.
- Inspect before you touch anything. Crawl the length of the underbelly (or use a camera on a pole) and note every tear in the belly wrap, every wet or compressed section of insulation, and any visible plumbing or electrical issues.
- Repair plumbing and wiring first. Fix leaking supply lines, insulate exposed pipes, and address any damaged electrical runs before you bury them under new material — you don’t want to reopen a sealed belly six months later.
- Remove damaged insulation and belly wrap. Pull out any wet, moldy, or compressed insulation. It won’t perform even if you leave it in place, and wet insulation against wood framing invites rot.
- Replace or patch the belly wrap. For isolated tears, a patch of matching material and weatherproof tape works. For widespread damage, replacing the entire belly board membrane gives you a clean, continuous seal.
- Install new insulation without compressing it. Lay batts or blow in loose-fill so it fully fills the joist cavity depth. Compressed insulation loses a significant portion of its rated R-value, so resist the urge to stuff more material into a space that can’t hold it.
- Seal every seam and penetration. Use weatherproof tape or sealant around the new belly wrap’s edges, plumbing penetrations, and support post intrusions to block moisture tracking and air infiltration.
- Add a ground vapor barrier if one isn’t present. A layer of 6-mil polyethylene sheeting over the exposed soil beneath the home stops ground moisture from migrating up into your new insulation.
Mobile Home Skirting and Vapor Barriers: The Unsung Heroes
Insulation alone can’t do its job if moisture and wind are working against it. Skirting and vapor barriers are what make the rest of the system actually function.
A ground vapor barrier — typically 6-mil polyethylene sheeting laid across the soil under the home — stops moisture from wicking upward into your floor joists and insulation. Without it, even brand-new insulation can become damp and lose effectiveness within a few seasons, and your floor framing is at risk of rot.
Insulated mobile home skirting closes the gap between the ground and the bottom of the home, blocking wind chill from stripping heat out of the underbelly. Rigid foam board skirting panels are a popular retrofit because they add real R-value without the cost of full enclosure construction.
The detail many homeowners miss is ventilation balance. Some airflow under the home is necessary to prevent moisture and mold from building up in the crawlspace, but too much ventilation in winter turns your underbelly into a wind tunnel that undercuts everything you just insulated. Foundation vents with adjustable covers let you open them in humid months and close them when temperatures drop.
DIY vs. Hiring a Professional Insulation Contractor
Some of this work is well within reach for a handy homeowner. Other parts carry enough risk that hiring out is the smarter call.
What You Can Safely DIY
- Adding rigid foam board to existing skirting
- Sealing windows and doors with weatherstripping and caulk
- Patching small, isolated tears in the belly wrap
- Installing a ground vapor barrier in an accessible crawlspace
When to Call a Professional
- Blown-in insulation for walls or attics, which requires specialized equipment
- Any spray foam application, given the precise mixing and weight considerations involved
- Extensive belly wrap replacement, especially where rot or structural water damage is present
- Anything involving electrical or gas line work uncovered during the project
Questions to Ask a Contractor
Before hiring anyone, ask specifically about their experience with manufactured housing rather than general residential construction. Mobile home framing, weight limits, and access points differ enough from site-built homes that standard techniques can sometimes do more harm than good — a contractor unfamiliar with bowstring trusses, for example, might overload a roof cavity with too much weight from dense-pack insulation.
Final Thoughts
Insulation problems rarely show up all at once — they show up as a cold spot near the back bedroom, a utility bill that creeps up every winter, or a skirting panel that never quite seals out the draft. Now that you know where manufactured homes typically lose energy and how to fix it zone by zone, you’re in a better position to prioritize your next project, whether that’s a weekend skirting upgrade or a full underbelly overhaul. What’s giving you the most trouble right now — drafty floors, a hot roof, or something in the walls? Drop it in the comments, and if this guide saved you a headache, pass it along to another manufactured home owner who’s dealing with the same thing.